
Halloween Craft: Glückskäfer Wool Pumpkins

Autumn Celebrations
Following my guide last month to Needle and wet felting using Glückskäfer wool, I thought it would be good to carry that on. This month, I will be demonstrating how make some pumpkins for a Halloween / Samhain display.
Halloween is my absolute favourite time of year, and I always go all out when it comes to celebrating the holiday, and my favourite season, Autumn. When it comes to Halloween, I always make a table centrepiece. All of the other decorations I put up are for the kids, but the centrepiece is just for me. It’s my little way of celebrating this beautiful season, and enjoying a bit of mindfulness as I put it all together. It really is quite calming.
With every change of season, or birthday and special events, I always include my Grimm’s celebration ring. I bought my celebration ring and accessories two years ago from Babipur. It was Halloween morning (which always feels like Christmas morning to me) and we rushed down to cherry pick our candles and figures. Since then, and every year that will come, these beautiful figures are the main feature of my Halloween centrepieces 🙂
Along with my celebration ring, my centrepiece usually has lots of pumpkins, leaves and candles, along with anything else beautiful and natural I happen upon at the time.

So this year, while I was shopping for pumpkins, I decided I would make some for my centrepiece. I thought they could be used every year and be a nice keepsake, something personal made by me.
So I dug out the Gluck wool and got started.
Fun with the family
It’s really quite simple to make these. The great thing is about this project is there is no ‘right way’ or ‘wrong way’ when it comes to what the look like at the end. I know in supermarkets etc we only see the most ‘perfect’ and symmetrical fruit and veg. Quite often odd shaped ones are discarded. Remember that just like us, fruit and veg come in all shapes and sizes, so don’t worry too much if yours isn’t ‘symmetrical’ or comes out a bit wonky 🙂
This is a fab way to get the children involved, it’s a lovely craft to do together and even a great way to introduce them to needle felting. Though of course if they are too young to use a needle, you can always get them involved by getting them to pick the colour you want your squash / pumpkin to be, and what kind of shape you want it to be too .
You can make pumpkins using the wet felting technique, or the needle felting technique. For this example I’ll be needle felting, as I find it much easier making 3D models with a needle. Before starting, you’ll need your trusty felting kit.
You’ll need:
- Felting needle and holder
- spare needles
- finger protectors
- foam mat (optional)
- wool
- cotton wool/ pads (optional)
Lets get started
Ok so you guys are probably reading this and thinking “eh? Why do I need cotton wool?”. When you make models using wool, you quite often construct a base for your model, something to work on top of. Models usually have wire armatures, my felt dragons all have wire or pipe cleaner skeletons. So when making something like this, I like to make a centre that I can build on. It also saves a lot of wool doing it this way.
So to start, grab some cotton wool balls or pads and roll them up to make a ball. This will differ in size / length / shape depending on what shape pumpkin you’re making. I rolled my cotton pads up and kept doing so until the ball was the rough size of a small plum.
Once you have your ball, start to wrap it up in small layers of your filling wool (chunky wool that’s nice and dense and excellent for making models, the Gluck wool will be perfect for this). As you layer it remember to stab it all over to fuse the wool into place, ensuring that it wont unravel. Keep doing so until you have a nice chunky wool base layer covering your cotton ball. Mine was the size of a clementine by time I had finished my base layer.
Make sure that you have as few loose fibres as possible and everything has been stabbed nicely into place.
Now that you have your base wool ball, you can start to add the grooves and details onto the pumpkin.
To start, grab some filling wool. You’ll want a long chunky strip that will reach from the top of your pumpkin and curve down to the bottom. Begin by stabbing the top of the strip onto the top of the ball, and work down both sides of the strip leaving the centre of the strip full and puffy. Keep doing this until the strip is fixed onto the top and the bottom of the ball, and the sides stabbed in place, with the main body of the strip remaining chunky.

You can stab the centre of the strip, but do it gently, shaping it to look like the ridge of a pumpkin. The edges which have been stabbed in place will form the grooves in-between each ridge as you build up the detail of the pumpkin.
Repeat this all of the way around until you have the basic shape and structure of your pumpkin.
When I add each strip I like to leave a little bit extra at the top, above where it has been fixed in place with the needle, as I will turn that into a stalk or stump later on.
Now you have your basic pumpkin shape you can start to shape it and work out any bumps etc that you don’t like. Ensure that you stab it all over to firm the wool and shape the details.

Once you have your finished pumpkin that you’re happy with, you can work on the stalk or stump on the top.
If you have left some wool at the top you can stab that into shape, or cut in to form a stump. If you haven’t left ant wool at the top, grab a chunk of wool and roll it into a sausage. Then begin to shape it with your needle ensuring you are stabbing it all over, firming the wool and shaping it until you are happy with your stalk. Once you have your stalk simply attach it to the top by stabbing it’s base into the top of your pumpkin. Keep doing this until the stalk is firmly in place.
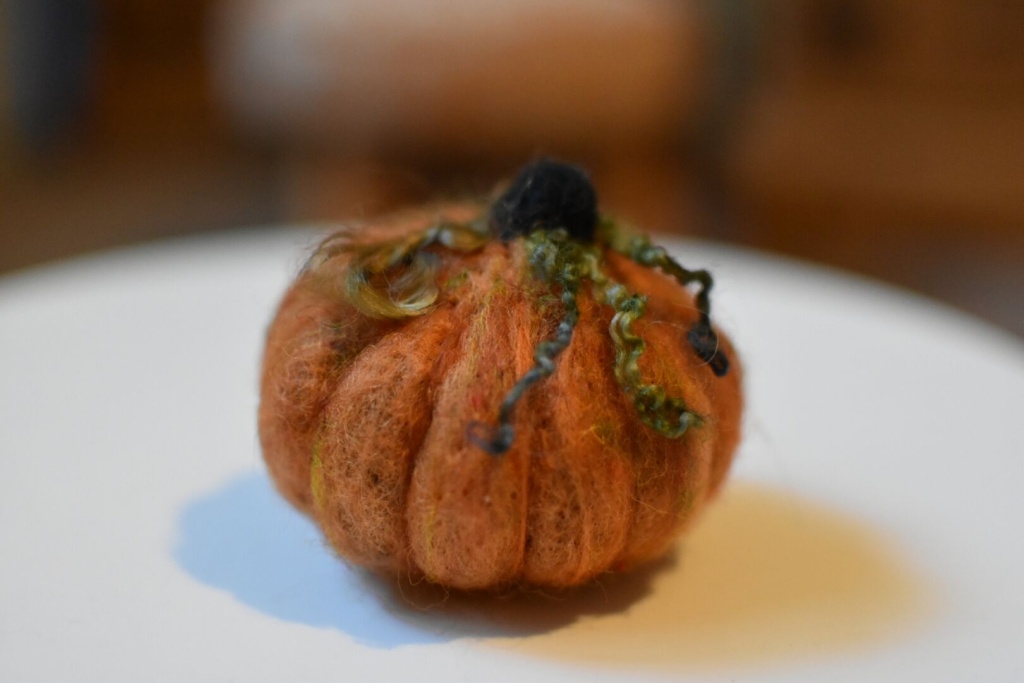
Ok so now we have a finished pumpkin with its shape and stalk. The final step is to add your colours, details and shades to it. I made my pumpkin with black filling wool, as I did not have enough orange to make the entire thing in just one colour. So with my pumpkin I began to layer thin strips of my final chosen colour on top of the black base.

If you have done the same as me then keep adding more and more strips of your final colour on top of your base until it is a lovely bright shade of whatever colour you have chosen. That way no base colour shows through.

To finish I like to add shading and a bit of detail to break up the colours a bit. However, not everyone will like or want to do this and that is totally fine. How you shade or detail your pumpkin is totally up to you, though I do find Google images very handy when looking at how to make convincing shades and colour variations on pumpkins 🙂
And there we are! I hope this article was useful to you and gave you some inspo to go out and try it yourself 🙂 I had great fun making these, and best of all it’s something that you can take out every year, making it far less wasteful than any Halloween decorations bought in shops 🙂

Huge thanks to Emily for sharing this guide to pumpkin needle felting with us xx
If you would like to see all the crafty loveliness we have at Babipur, you can find it >here<


