
Babipur Crafts: Guide to Needle and Wet Felting
Hello all!
My name is Emily, I’m an artist and blogger from Gwynedd, North Wales.
I discovered needle and wet felting in January this year after my mum bought me a starter kit for Christmas. Up until then I’d mainly used acrylic and watercolour paints as my main media, but had always been curious about felting. Well, that was 7 months ago and I’ve been hooked ever since!
In this post I’ll be guiding you through both needle and wet felting, and to do this I’ll be using the fantastic Glückskäfer Felting Wool.
I quite often buy my felt from local crafters, but I’ve long been curious about the Glückskäfer wool and whether it would be any good. I was not disappointed when it arrived in the post, the colours were lovely and vibrant and the wool itself was lovely and thick, with minimal loose fibres (which is be great when needle felting as it flattens much easier). The wool is lovely and chunky and puts me in mind of filling wool (chunkier wool you use to make the bulk of a felt model for example); and so I knew it would make some lovely pieces.
I’m going to walk you through needle felting first, as that has been the main way I make felt pictures. I love the results you get from wet felting, but I prefer needle felting as it’s far less tiring on your arms ( as you’ll soon discover!).
Needle Felting
STEP 1: What you will need
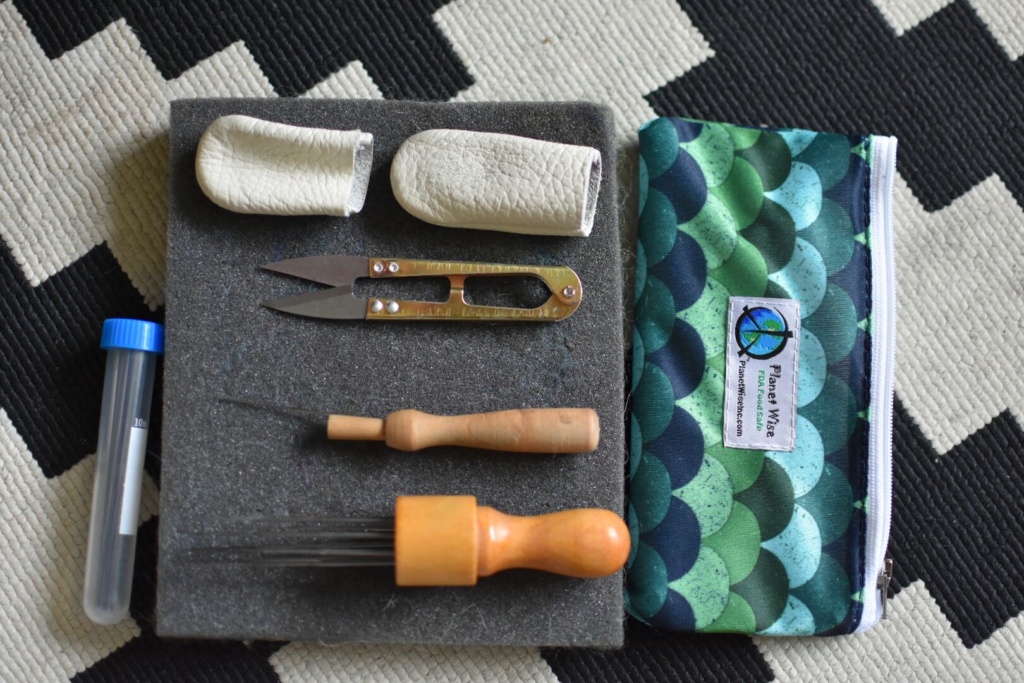
There are a few bits you’ll need to get you up and running with your needle felting journey, you’ll need:
- Needles and holder– this is the main tool you’ll need, it does most of the bulk of your work and is excellent for small details. Make sure you have spare needles, because they do snap occasionally.
- Multiple-needle holder – this is excellent if you want to cover a large area and flatten the fibres quickly, it certainly saves time when you’re working on bigger pieces.
- Thumb and finger protectors– these are more for if you are needle felting a model. No matter how careful you are, you will get the odd finger prick now and then.
- Sponge– a square piece of sponge or foam will form the work base for you picture. I tend to lay a piece of felt sheet or fabric down to form the ‘canvas’ of the picture. Here’s why you need a sponge or foam base: The sponge is the base, the felt sheet is the canvas; when the wool fibres are stabbed with the needle, it’s barbed edges help push the wool down through into the sponge, and as the needle comes out it pulls the fibres back out again, weaving the fibres into the felt sheet which helps it stay in place.
- Something to store your kit safely– This isn’t a must, but it gave me a good excuse to go and buy a nice Planet Wise snack bag to put it all in 😉
STEP 2: Getting started

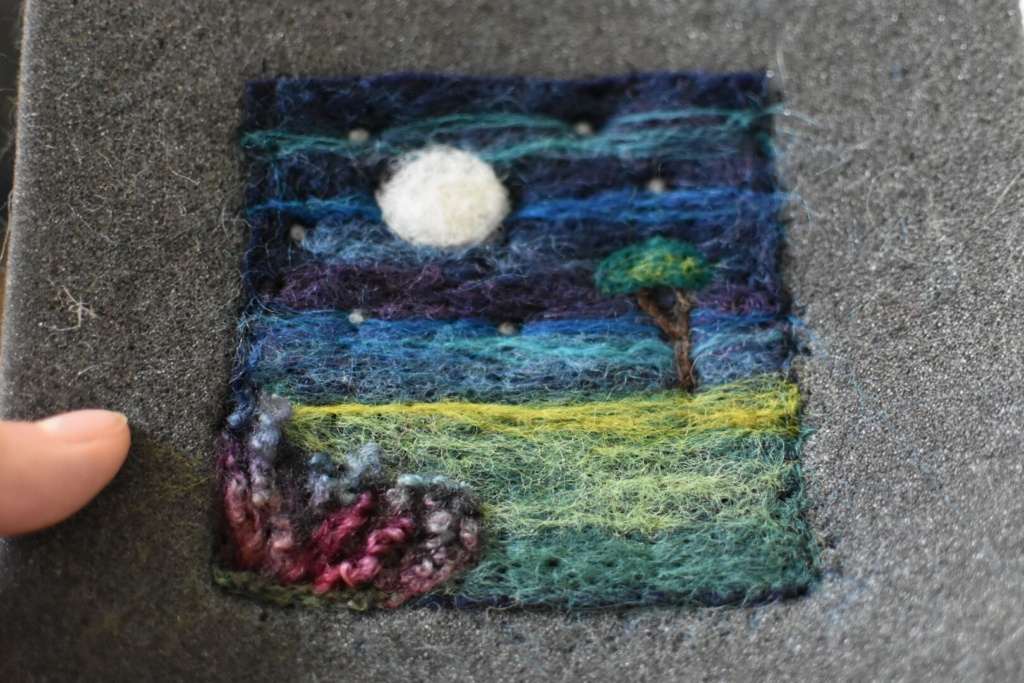
Get your foam or sponge base and lay out your pre-cut piece of felt sheet (in whatever shape and size you want your picture to be). Start by laying out the base colours for your picture. In my case I shall be creating a night sky with a moon and some grass and foliage. So to start I lay the colours for my sky and grass.
Start off by laying thin layers of wool and stabbing them in place so they’re flat to the felt sheet. Keep doing this until you have a basic base background for your picture, ensuring that it’s flattened nicely with minimal loose fibres.


STEP 3: Layering
Begin adding more colours and depth to your picture by pulling thin fibres out from your wool and laying them onto your picture. Stab each layer in place ensuring its flat to your picture before adding the next layer. By doing this your picture will begin to build up a lovely pallet of colours and tones, which will add depth to your picture and can help add lovely contour to your landscapes.

STEP 4: Detail
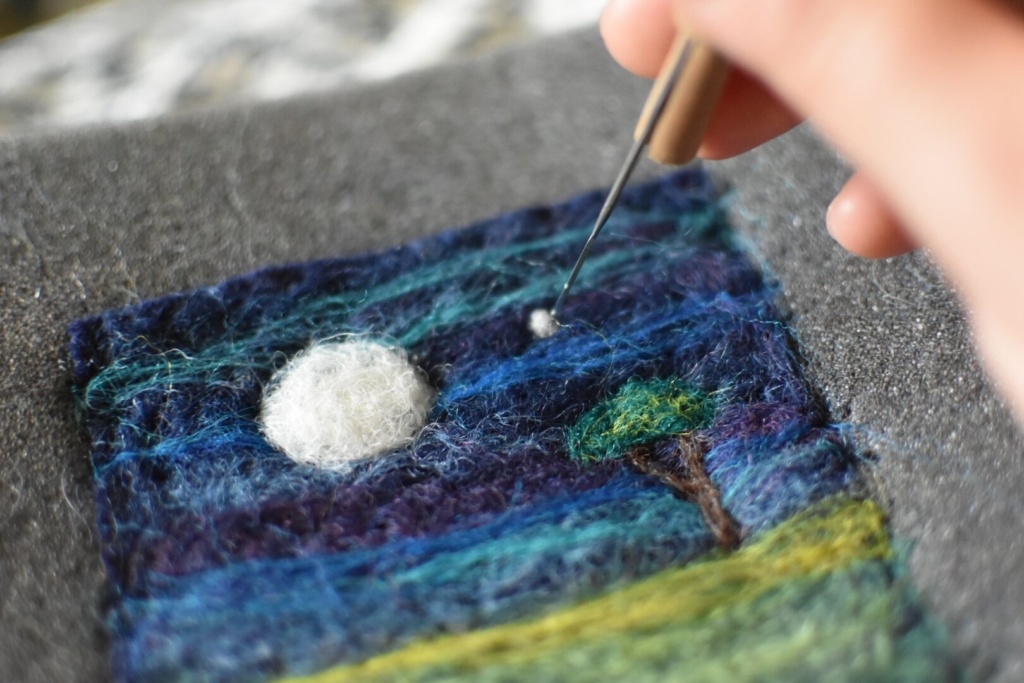
When you’re happy with your picture and the colours, shading and details that help form the bulk and base of your picture, you can start to add details. In my picture I’ll be adding a moon ( as I love creating moons and night sky artwork). To make a moon (or a sun) get a small lump of wool and begin to manipulate it with your fingers, teasing it into a ball like shape. Press it onto your picture and keep it in place with your index finger. As you keep it in place with your finer, begin to stab it gently in place. Don’t worry if your moon unravels or loses shape as you work on it, just focus on flattening it onto your picture, while shaping around it to keep it nice and circular.


Once you’re happy with your picture you can begin to add other small details. In my picture I have added a small tree and some stars. I also added some foliage with some of my curly wool for effect and texture.
The great thing about needle felting is if you don’t like something you’ve added in, you can simply unpick it with your needle and remove it and try again. Needle felting is all bout experimentation, so don’t be put off if you find adding details etc quite fiddly- I still do even now from time to time.
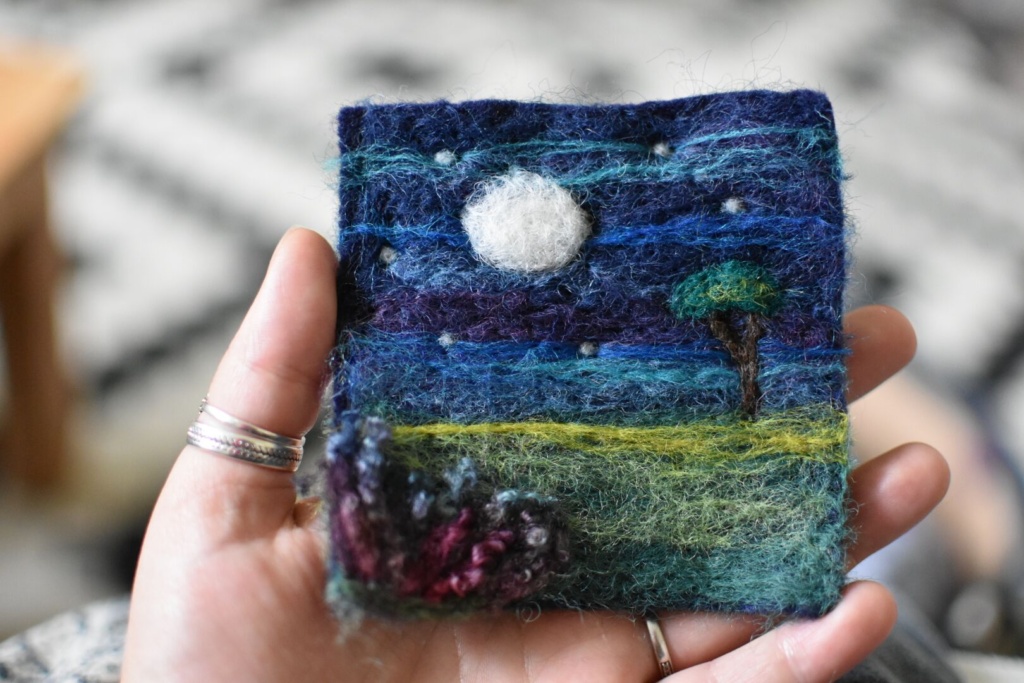
Once you’ve finished with your picture, gently tease one of the corners of your picture off the sponge. It will be stuck pretty firmly in place, but gently ease it off bit by bit until your entire picture is off the sponge. Trim the loose fibres off the sides of your picture to tidy it up and you’re done 🙂
Wet Felting
Wet felting can produce some really beautiful pieces, and can often make your pictures look like they’ve actually been painted. The difference between wet and needle felting is that with needle felted pictures they are often quite chunky and the fibres are fairly loose as they’ve only been stabbed into place. With wet felting the fibres are forced to fuse together due to the wetting process, and so your finished piece should be flat and there should be no loose fibres. One of the pros of wet felting is that you can produce much larger pieces then you can realistically with needle felting.
STEP 1: What you’ll need
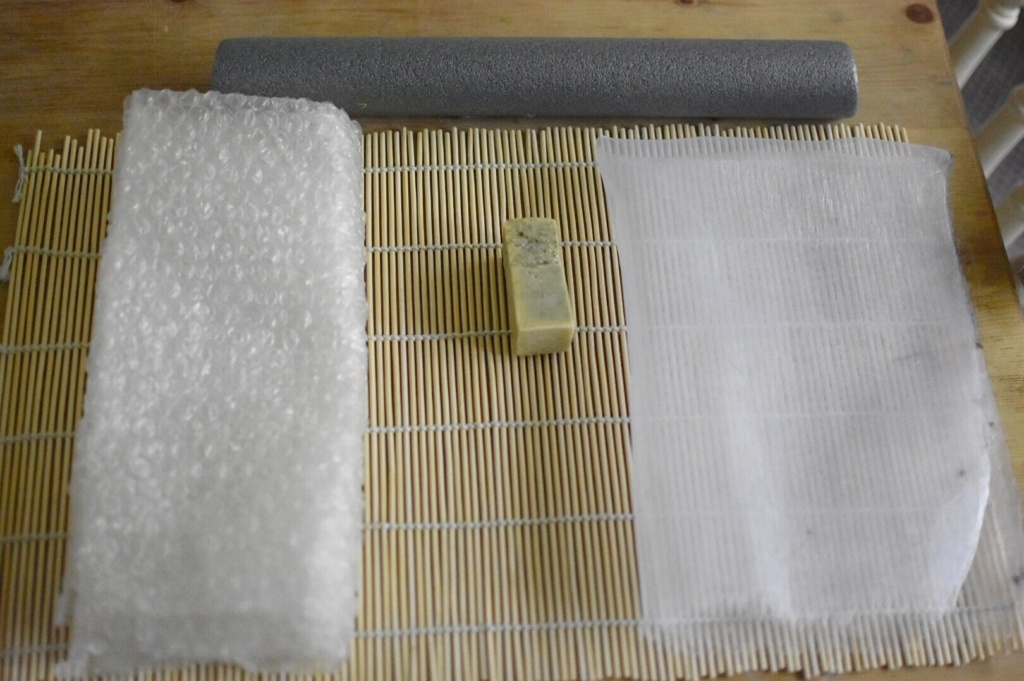
- Towel – there is a fair bit of water and soap involved in the wet felting process, and so it’s good to lay a towel down to catch any water that may escape as you work.
- Soap-olive oil soap or washing up liquid– this is very important as the soap helps your fibres stick and fuse into place
- Bamboo mat– this is the first layer of your picture. This will roll up your picture and keep everything in place as you work.
- Bubble wrap– a handy waterproof layer to stop the water and soap solution escaping through the slats of your bamboo mat. It’s bubbles also put pressure on the fibres of your picture to help press them in place as you work.
- Netting/ mesh sheet- This is Important as this is what you build your picture up on. The sheet should be see-through so that you can see how your picture is coming along as you work, allowing you to make any adjustment if you need to along the way. It also helps keep the fibres in place as you work. The netting is great too because it absorbs the soap nicely and soaks it though onto your work, which helps fuse the fibres together.
- Foam noodle (pipe insulator) This will be used to roll your picture, along with the netting, bubble wrap, and bamboo mat up as you work.
STEP 2: Getting started
To start, place your towel down, followed by your bamboo mat, bubble wrap (bubbles facing up), and net sheet.
Begin to place your wool down onto the netting, forming the size and shape of your picture. You need to place fairly thick layers down onto your netting, wet felted pictures do tend to use up more wool than needle felted ones. Keep layering your picture until you have worked up a nice base, about 2cm deep. Don’t forget, no matter how thick and chunky it may look, the aim is to make it completely thin and flat, so you need to build up a nice thick base.

STEP 3: Detail
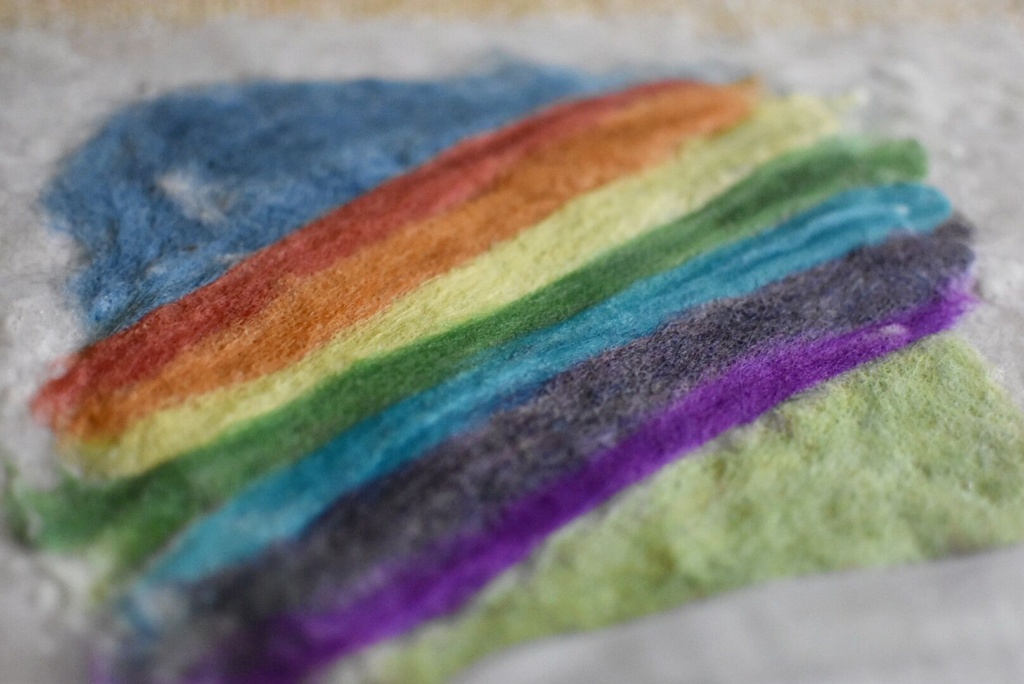
When it comes to adding detail in wet felted pictures, I tend to add basic detail and shading, wet felt it so it’s nice and flat and then needle felt and embroider finer details on top once the main piece is dry. So that’s what I’m going to do here. I’ going to make a very basic picture, so as my base I have layered a sky and grass. On top I have layered a rainbow (I have tried not to make the colour sections too wide as they will become flatter and wider as they go through the rolling process). Once this is dry I plan to needle felt a Babipur elephant over the top 😉
STEP 4: Wetting and soaping
Now that you have your picture, using the rest of your netting, cover over your picture. Get some warm water and use a cloth to cover your entire picture with water until it is wet all over and slightly flatter. Very gently run your cloth over your picture in a circular motion to ensure the water has gone all the way through. Be careful not to disturb your picture underneath too much.

Once your picture is wetted through, take your olive oil soap or washing up liquid and begin to add the soap gently over your picture. If you’re using washing up liquid, squirt it over your picture and begin to gently work it over the picture with your cloth (or fingers) massaging it in a circular motion, ensuring the soap covers the whole picture and goes all the way through. If you are using a bar of soap , run the bar gently over your picture and repeat until the whole area is covered and soaked through.

Once the upside of your picture is completely soaped all the way through, gently flip the netting which is holding your picture and repeat the above steps on the back of your picture to make sure the soap has gone all the way through.
STEP 5: The tiring bit…
This step is the most tiring as you use a lot of your upper body muscles ( arms especially) during this process.
Now that you have your wet and soaped picture, it should hopefully be a lot flatter. Now get your foam noodle and begin to wrap your bamboo mat, bubble wrap and picture inside your netting up together until it is all rolled up and you’re left with a bamboo roll. Take your bamboo roll and press down and roll it in a backwards and forwards motion 50 times (ensuring it all stays tightly rolled up).

Unroll it and flip the netting with the picture in it 90 degrees and repeat the process. Do this ten times, ensuring the whole time that your roll is tight. This pressure and repeat rolling will press the fibres together and help them fuse, so that you’re left with a lovely flat picture at the end. Run your fingers gently over your picture- the fibres should be fused in place and shouldn’t move. If they do, roll it up and repeat the above steps until it is.

As with all things, when you try it for the first time it may not be easy or may not come out how you expect. Just keep trying, keep at it and with practise you’ll have it mastered 🙂 Once you’re happy with your picture hang it up to dry.

Once dry you can add your details and embellishments on top with needle felting and embroidering if you wish 🙂 Trim the edges to tidy and you’re all done 🙂

I hope this article has helped you understand the needle and wet felting process, and I hope you had some fun while giving it a try, wet and needle felting is a great hobby to have. You can produce some really gorgeous pictures and models, and wet felting especially is a great activity to get the kids in on too 🙂


2 Responses
[…] my guide last month to Needle and wet felting using Glückskäfer wool, I thought it would be good to carry that on. This month, I will be […]
[…] The Glückskäfer wool is a dream to work with. It’s so soft and comes in a array of natural vibrant colours. It was so easy to felt with. This wool is great for both needle and wet felting. Wet felting in particular is great for wee ones to join in with. You can find more about wet felting over on this blog. […]