
Babipur Autumn Crafts: Felting, Modelling Clay and More
We love the changing seasons here at Babipur and it seems our team does too! Join us getting creative with some Autumn Crafts. We have a great selection of eco craft supplies, ready for your imagination to run wild!
Huge thanks to our buddies and team for getting stuck in to create some fantastic Autumn Crafts to share with you all on the Babipur Blog.
In this blog we have featured some of the craft resources you can find at Babipur. Head over to this blog to read about some of the other Autumn Crafts using a selection of different paints and techniques! If you fancy having a go at pressing flowers, Ellie and Siobhàn have some fun activities you can read about over on this blog too.
>>Shop Arts and Crafts at Babipur >>HERE<<
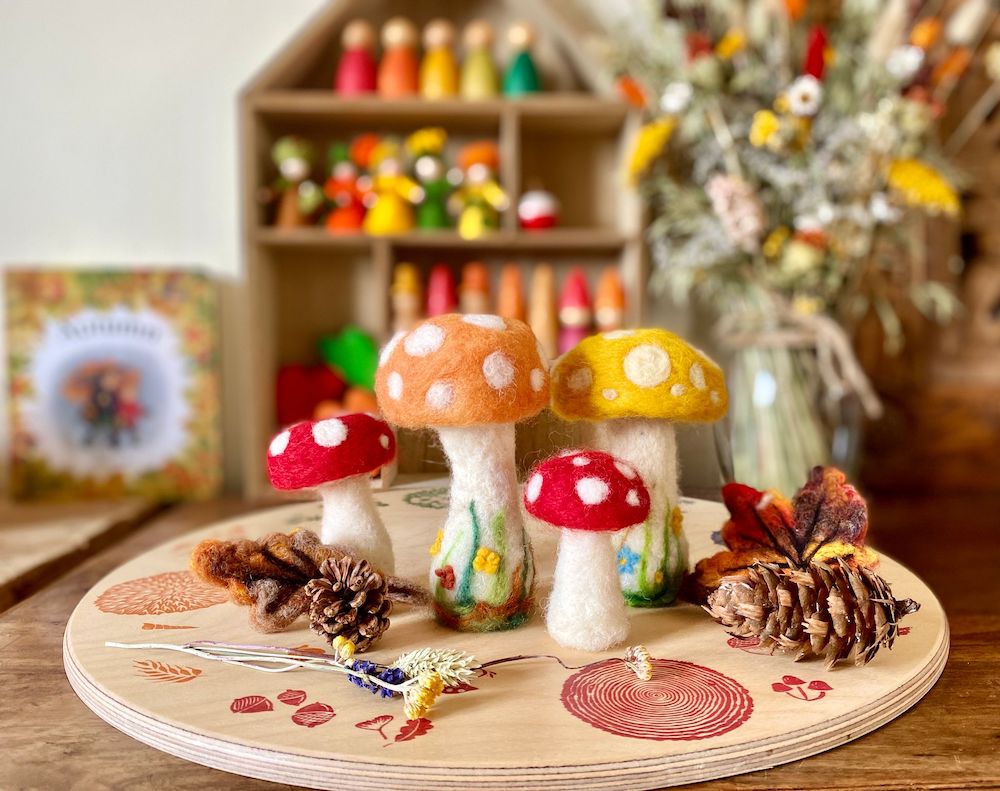
Mushroom Felting with Glückskäfer – Danielle Benner

Autumn has got to be one of my favourite seasons. The changing colours of nature, golden sunlight, crisp air, crunchy leaves and fun autumnal crafts.
There’s nothing quite like getting cosy on the sofa as the nights draw in and getting your crafting on!
Needle Felting is such a lovely craft. I love that you can turn a ball of wool into a fuzzy felted creation. It is the perfect time of year to make Autumnal themed decorations for seasonal displays and small world play.

Needle felting is the process by which you use the needles to poke the wool to interlock and entangle the wool fibres together and shaping it into the desired shape. All you need to get started is:
- Glückskäfer wool
- Felting needles
- Felting mat

I’ve have been eager to test out the Glukskafer wool from Babipur so was really excited to be given the opportunity to create something for their Autumnal craft blog and what calls out Autumn more than toadstools!
We love nothing more than a walk in the woods spotting all the unusual fungi. Toadstools are one of nature’s amazing treasures. We absolutely love them here and it’s no wonder they are one of my favourite felting creations to make.
Creating a felt toadstool couldn’t be simpler and are great for beginners. Here’s my step by step guide:

Place your wool on the felting mat and use your felting needle at a diagonal angle and poke into the wool. This will entangle the wool ‘felt’ so it holds together.
Slowly turn the wool as you do this and it will become firm and felted into the shape you require. I make the stem and cap separately and attach once all the details have been added.


You can create toadstools in all different shapes and sizes which will add a lovely personal touch to your Autumn seasonal display.
My tip to make your toadstool stand up is to apply more wool to base of the stem to make it wide and tapered. Use the needle to poke upward into the base of the toadstool making it firm enough for standing.

The Glückskäfer Wool is a dream to work with. It’s so soft and comes in a array of natural vibrant colours. It was so easy to felt with. This wool is great for both needle and wet felting. Wet felting in particular is great for wee ones to join in with
DIY CLICQUES – Hannah Tozer

When Babipur asked if we’d like to get involved in the Autumn craft blog, we jumped at the chance! It’s right up our street, and I knew exactly what we wanted to try.
We recently bought some of the DIY CLiCQUES from Babipur and wanted to turn them into Autumn toadstools.
If you want to have a go at home, here’s what you’ll need:
- DIY CLiCQUES dolls (we chose Lola & Coco)
- ÖkoNORM Modelling Clay 4 Earth Colours
- Acrylic paint
- Paint brushes
- Wooden skewer
- Wooden cocktail stick
- Clay tools

1. First we painted the CLiCQUES DIY Toadstool set. We used acrylic paints, and gave them several coats. We used an old tin can to stick the magnetic pieces on, which made them much easier to paint.
2. Once dry, we added the white spots. For the larger spots we used the blunt end of a wooden skewer. We dipped it in white paint and then printed it onto the toadstool top. We added a few smaller dots, using a cocktail stick, in the same way.

By now we were feeling more confident, so we thought we’d start the dolls.
3. We wanted to create a toadstool, so we decided to paint the doll in a very neutral colour, like the stem of a toadstool. We painted each piece and left them to dry. We applied 3 coats of paint, to give a smooth finish.
4. Around the neck of the doll, we added a very thin strip of the ÖkoNORM modelling clay, and used a sharp knife to make small incisions. This created a frill type effect, forming the ring at the top of the stem.

5. Next, we applied a ball of the ÖkoNORM modelling clay to the dolls head. We shaped it using our fingers, until it resembled the cap of a mushroom. I used a couple of clay tools to smooth the dough. It’s really easy to work with, and really soft.

6. I then used a sharp metal clay tool to press an indent in the underside edge of the cap. This formed the gills of the mushroom cap.

7. Leave the clay to dry, which took about three days. It’s then ready to paint in the same way as the Toadstools. We painted the cap red, and added white spots again. Several coats of red paint were required to cover the dough. There was some shrinkage as the dough dried, which led to a slightly bumpy surface, but it didn’t spoil the finished product.

We are delighted with our Toadstool CLiCQUES and next time we are going to try a pumpkin, ready for Halloween. The DIY CLiCQUES are so much fun to make your own creations and we loved working with the ÖkoNORM modelling clay.
ÖkoNORM Modelling Clay Pumpkins – Heather

Autumn is my favourite season. I was talking to my Dad the other day, we were saying how it feels like such a poignant time of year. We reflect on all the summer fun we’ve had, whilst embracing the change of the seasons, welcoming in the darker evenings and cosy days. All around us is a constantly changing colour palette that just feels like a little bit of magic.

Last week I spent some quiet time with my youngest son Eli making some mini pumpkins from ÖkoNORM modelling clay. We use this a lot, it keeps Eli busy for ages chopping and mushing colours together – perfect for for developing motor skills.

He was able to roll little balls to make the start of a pumpkin and start to make some marks with a cocktail stick down the side. I helped finishing off the details!


To add a bit more texture to the design, we dusted them with Natural Earth Paints. We use this a lot as a colouring ‘dust’ as well as mixing with water to make paints too. The earthy tones of these paints are perfect for Autumn.


This is such a simple craft that any age can get involved with. These eco craft supplies are perfect for little hands to explore.
The little pumpkins have made a lovely addition to our celebration ring.

Huge thanks to Hannah, Danielle, and Heather for sharing their beautiful crafty creations with us on the blog!
>>Shop Arts and Crafts at Babipur >>HERE<<
Share with us!
We love to see what craft and fun you get up to at home; share your pictures and thoughts with our community! Tag @Babipur on Instagram, Twitter, and Facebook, or share your pictures with the Babipur community in our Facebook group, Babipur Hangout!


3 Responses
[…] this blog we have featured some of the fab painting resources you can find at Babipur. Head over to this blog to read about some of the other Autumn Crafts our team have been up to using Felt, Modelling Clay, […]
[…] over to this blog to read about some of the other Autumn Crafts our team have been up to using Felt, Modelling Clay, […]
[…] Babipur Autumn Crafts: Felting, Modelling Clay and More […]